
|
Problem
with the site?
Email the Friends
Tracks in the Hayward Scenic Reserve
The original track formed by Hayward farm labour ran from the homestead on to the ridge immediately to the north of it, where a flagpole once stood. From there, the track divided, penetrating into the Reserve at three different levels. A track was then cut to the south, giving access to the bottom of the Wainuiomata Hill Road. Later, from the track alongside the Whites Line stream, further tracks were cut northwards to a prominence called Cabbage Tree Knoll on what is now the Te Whiti fire break ridge, and upwards through a bush gully to a point named 100 Mile View. The Knoll provided a rewarding view of the Hutt Valley and Wellington Harbour. The magnificent outlook from 100 Mile View extended to Mt Tapuaenuku in the Inland Kaikoura Range, the nation's next highest mountain (2885m) after Mt Aspiring and the main peaks in the Mt Cook area.
The remains of most of what was the lowest level track have long been incorporated into subdivided residential lots. The original mid-level track, now known as the Hayward Track, provides a pleasant bush walk link between Whites Line East and Mawson Street. Most of the other historic tracks on public land can still be followed. There are no really easy tracks, but most can be walked by people of average fitness. Whilst the tracks can be walked in light footwear such as track shoes, boots are recommended, particularly in winter or after rain when slippery conditions and some soft surface areas are likely to be encountered.
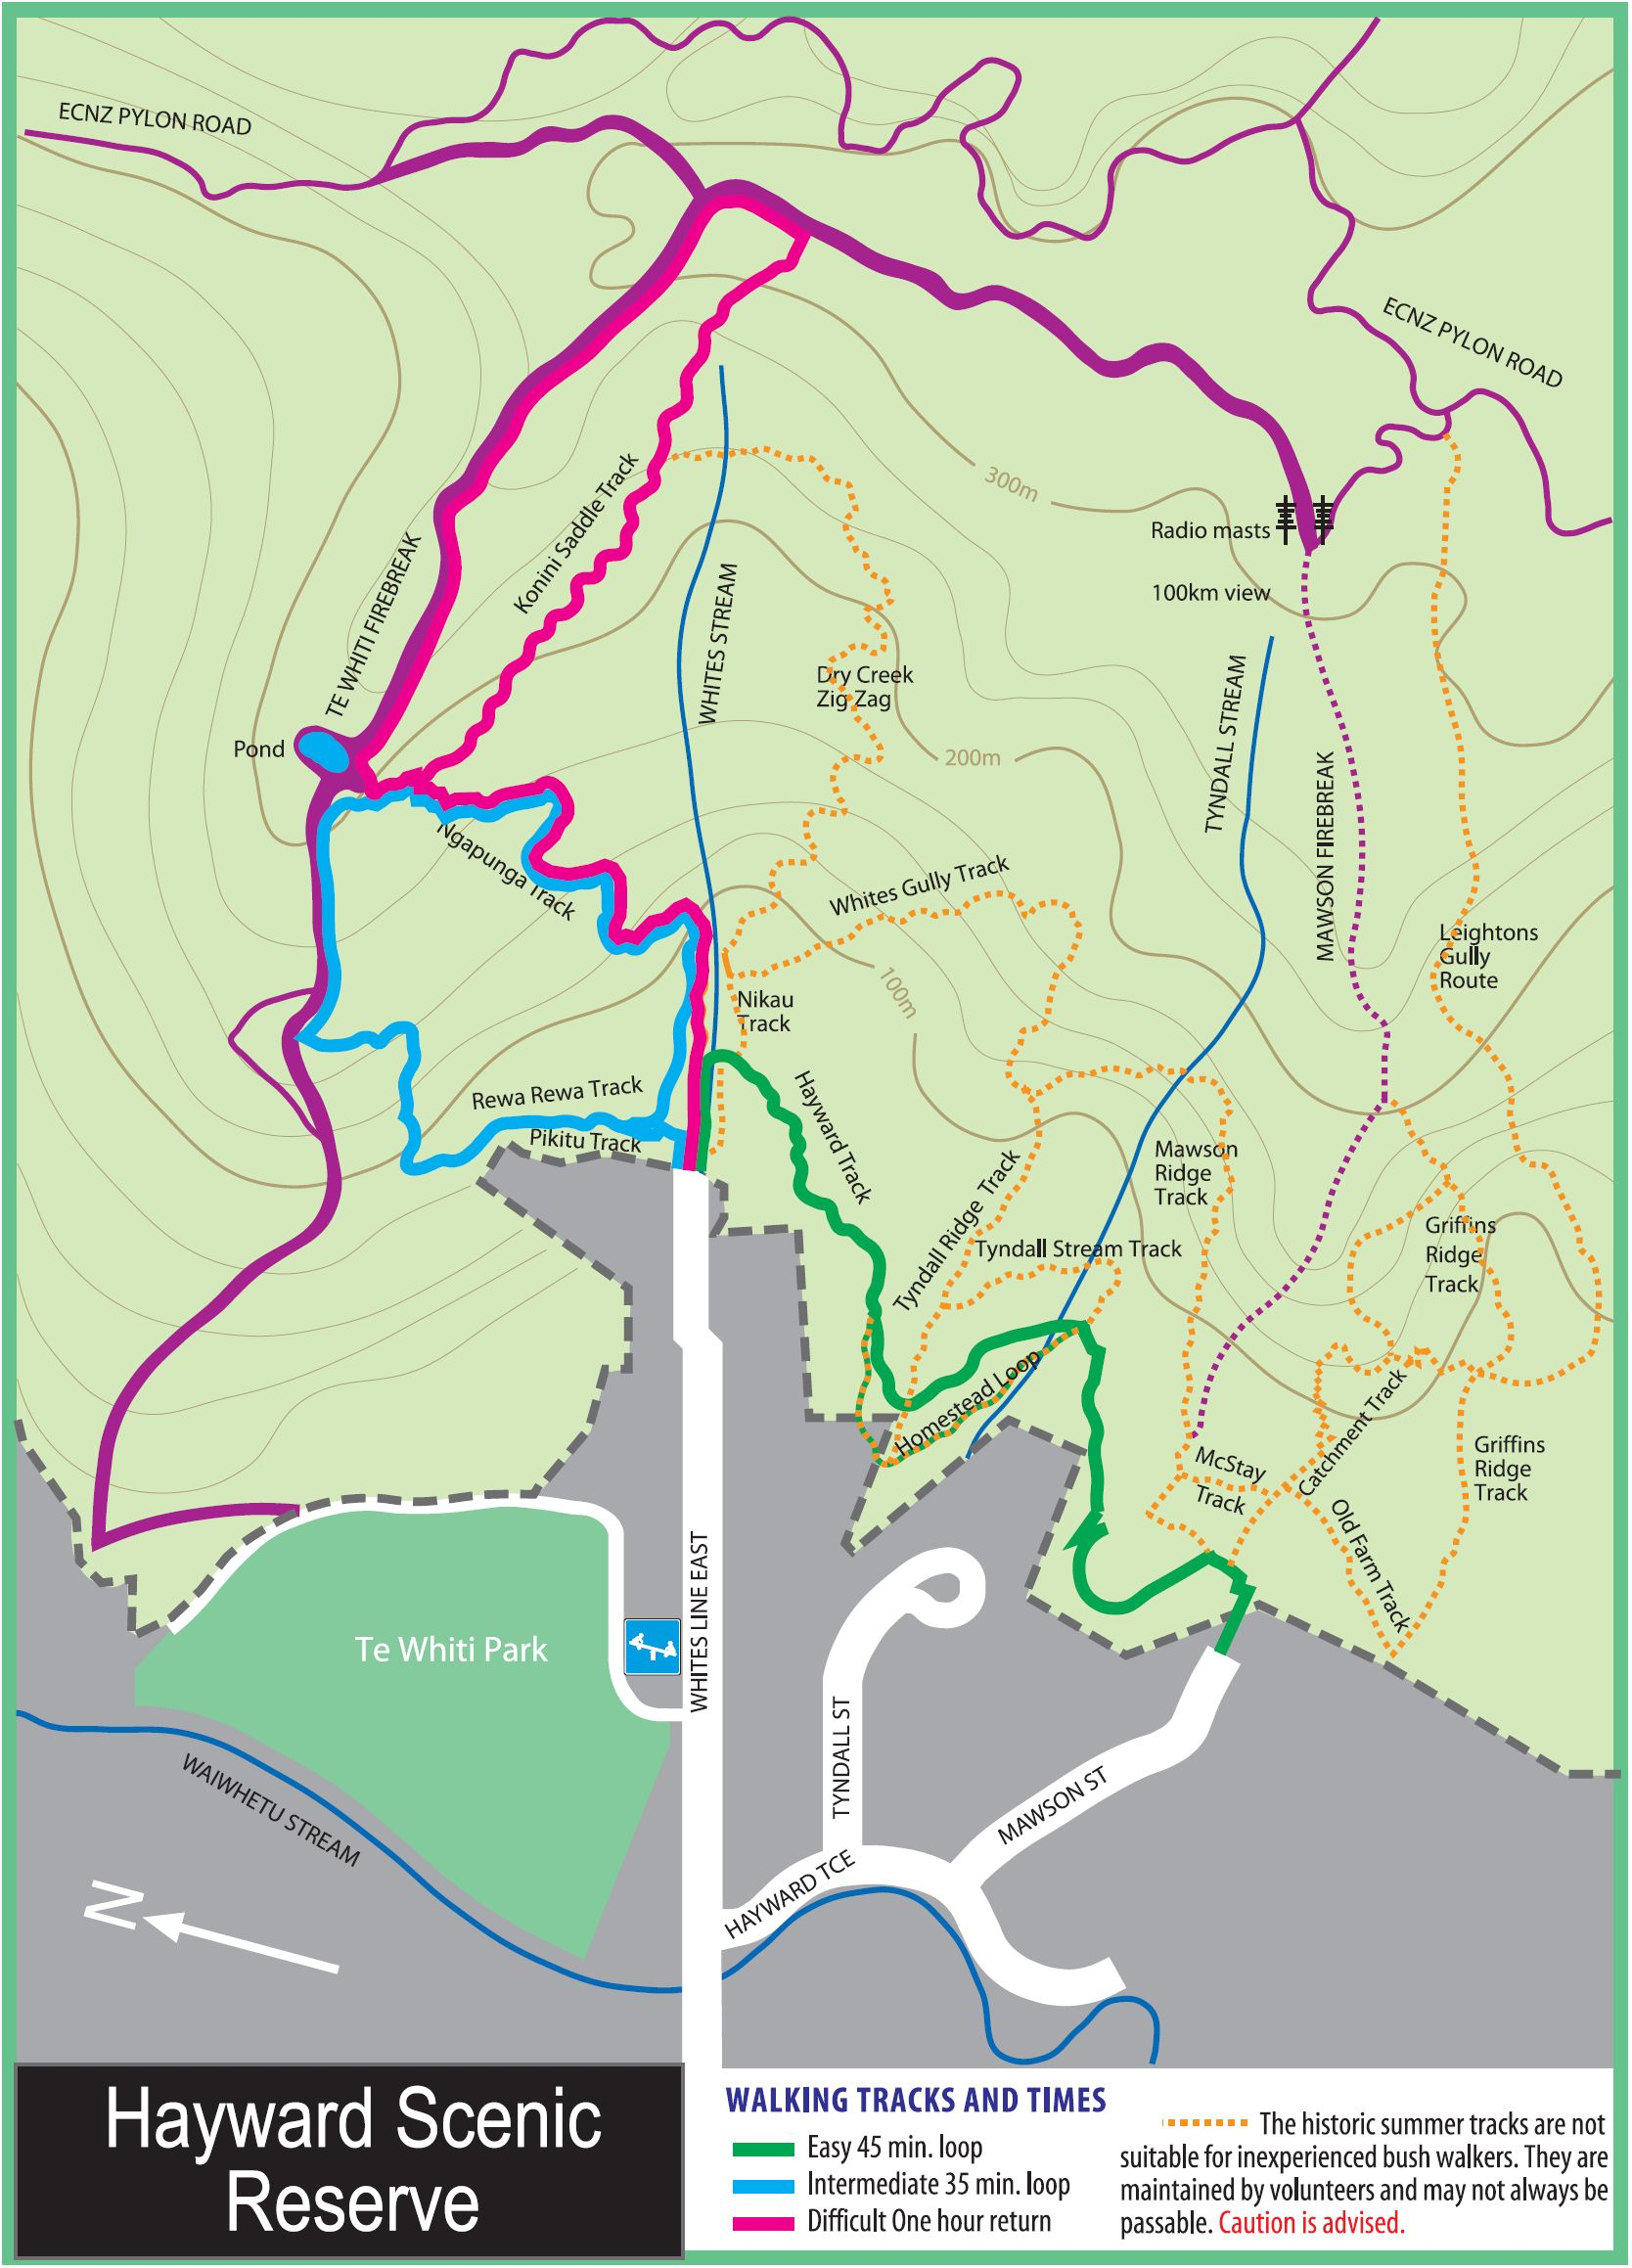
This map shows the tracks around the reserve. The thicker lines are the firebreaks. Descriptions of the tracks are below the map.
|
Track name |
Duration (minutes) | Brief Description |
|
Lomaria Track
|
8
|
The historical "Lomaria" name has been
given to that part of the main track running uphill from the Whites
Line entrance as far as the junction with the Rewarewa Track on
the left, and the Nikau Track opposite on the right. Soon after
the start, the Lomaria Track passes the Pikitu Track turn-off on
the left. Further up on the right, around 5 minutes from the Whites
Line entrance, the turn-off to the Haywards Track drops down to
cross the Whites Line Stream.
|
|
Haywards Track
|
40
|
The Hayward's track is the main track that runs
southwards from the Lomaria Track, providing a pleasant bush walk
between Whites Line East and Mawson Street. It is the easiest track
in the reserve and follows a bench track marked with rectangular
orange-coloured official Hutt City track markers. After the massive
February 2004 rain storm, flood debris in and bank scouring of the
Tyndall Creek bed required walkers to scramble up a steep slope
to reach the bench track on the south side. Hutt City Council has
now placed steps there to overcome this access problem.
|
|
Pikitu Track
|
5
|
The entrance is on the left a short distance from
the start of the Lomaria Track. The Pikitu Track provides a short
cut up to (or down from) the Rewarewa Track. The surface can be
slippery in places when wet.
|
|
Ngapunga Track
|
30
|
The Ngapunga Track is one of the main tracks in
the Hayward Reserve and runs uphill from the end of the Lomaria
Track above Whites Line East to the fire pond on the Te Whiti fire
break. It is well defined and is maintained by the Council's Reserve
staff. The track is not marked but is easy to follow in most cases.
It can be steep in places and slippery in the wet.
|
|
Rewarewa Track
|
30
|
This track runs off sharply to the left from the
end of the Lomaria Track and is an easier option for access to the
Te Whiti fire break. It starts about 8 minutes from the Whites Line
East entrance. The track is not marked but is well defined. Well
up the track the local scouts have erected a seat from which you
get a good view across Te Whiti Park and the Petone foreshore. The
steep clay steps giving access to the fire break can be slippery
when wet.
|
|
Dry Creek Zigzag Track
|
40
|
The Dry Creek Zig Zag track is a narrow, moderately
difficult track suitable for people who are reasonably sure-footed,
as the descent can be a little steep and slippery on occasions.
When descending from the Konini fire break (on the skyline ridge)
via the Konini Saddle Track, look for a sharp left turn-off which
takes the track southwards and zig-zagging down to the Nikau Track
close to its intersection with the Haywards Track. Upwards access
from the Nikau Track can be hard to find. Its turn-off is on the
right soon after leaving the Haywards Track.
|
|
Konini Saddle Track
|
90
|
The Saddle Track is a moderately difficult track
suitable for people of reasonable fitness. It is only difficult
because it is a steep climb most of the way to the saddle. Despite
the climb it is one of the most rewarding walks in the reserve as
it has what is arguably the best views over Whites Line East, Lower
Hutt and Petone. To access this track, take Lomaria and Ngapunga
tracks from the entrance on Whites Line East. At the fire pond intersection
follow the sign to the right. About 10 mins on, continue uphill
past the Dry Creek Zig Zag Track turn-off on your right. Follow
the track from there to the fire break at the top. Take special
care when descending under the predominantly Mahoe bush canopy near
the top - fallen leaves covering slippery tree roots can provide
a treacherous footing.
|
|
Nikau Track
|
5 mins.
|
The upper entrance is on the right at the top of
the Lomaria Track, virtually opposite the junction with the Rewarewa
Track. The Nikau Track winds down through a glen containing many
nikau palms. It passes the bottom entrance to the Dry Creek Zig
Zag Track and emerges on to the Haywards Track not very far south
from where the latter crosses the Whites Line Stream.
|
|
Whites Gully
Track
|
35 mins
|
Access is from the Haywards Track, on the left about
20 metres past the Nikau Track junction. Whites Gully Track is a
well benched track which in the main gradually climbs upwards as
it crosses the bush covered hillside southwards. There are a few
short zig zag sections where the route steepens. It levels out near
a group of old pine tress. Further on it intersects downwards on
the right with the top of the Tyndall Ridge Track, and straight
ahead southwards with the Mawson Ridge track.
Descending via the Tyndall Ridge Track is the quickest way back to the main Haywards Track. Both the Whites Gully Track and the Tyndall Ridge Track have just recently been cleared of storm debris and encroaching vegetation. The alternative route southwards via the Mawson Ridge Track is once again passable, but requires considerable care when negotiating the headwaters of the Tyndall Creek. |
|
Mawson Ridge Track
|
40 mins from |
This track runs off the Hayward's track about 15 mins from the Mawson Street entrance. At the crest of the ridge, turn right where there is a small wooden sign nailed to a prominent kanuka tree. Proceed up to just below the base of the Mawson fire break. The track begins on the left (north) of the fire break, sidling and gradually climbing on the south side of Tyndall Gully. The original bench formation of the track is reasonably clear to follow, but care is needed where it crosses some old slumps. Also, the track is tricky at the top where it descends and crosses the upper reaches of Tyndall Creek. Just beyond this point the link to the Tyndall Ridge Track is once again passable, but does require considerable care. |
|
Tyndall Ridge Track
|
20 Mins from the Tyndall Link Track |
The Tyndall Ridge track is mostly a moderately steep track, which leads to the Whites Gully Track. It also leads to a short track known as the Tyndall Stream track. From the Tyndall link track follow the ridge east. You will climb east for approximately 5 minutes before you reach the intersection of the Tyndall Ridge track and the Tyndall Stream track. The intersection is marked by a prominent pine. The ridge track climbs further east behind the pine whereas the stream track runs south across Tyndall Gully. The ridge track continues to climb steadily until it reaches the top where it intersects Mawson Ridge Track to the south and Whites Gully track to the north. Near the top the ridge track is quite steep, but the placement of timber faced steps here now greatly assists the negotiation of this section, particularly on descent. |
|
Homestead Loop
|
15 mins
|
Runs west off Hayward's Track down Tyndall Ridge
before looping back up Tyndall Gully, behind the original Hayward
homestead, to rejoin the main Hayward's Track. Use this track to
find the gold mine.
|
|
Tyndall Loop
|
2 min short cut
|
This is really a section of the main Hayward's Track.
It is a short length of track which links Tyndall Ridge with the
south end of the Homestead Loop Track.
|
|
Tyndall Stream Track
|
10 Mins from Hayward's Track
|
Runs off Hayward's Track on the south side of Tyndall Stream. The track is currently quite well formed. Initially, it does traverse a very steep slope, with few vegetation hand-holds, as you climb up with the stream bed seemingly in an unnerving drop well below you. The track levels off and crosses the stream bed. Once up a steep bank with recently cut earthen steps, the track sidles easily north to intersect with the Tyndall Ridge Track. |
|
McStay Track
|
15 mins from Hayward's track
|
A narrow alternative track above Mawson Street.
It sidles southwards just below the base of the Mawson fire and
leads down to the mid-level bush basin in the Mawson Creek catchment.
From there an easy to follow trail leads down to the Haywards Track
about 3 minutes from the Mawson St exit.
|
|
Mawson Catchment Track
|
40 mins from the Mawson Street entrance
|
The Mawson Catchment track is a difficult track
suitable for adventurers who like to climb and don't mind testing
their route finding skills. The track is accessible either from
Mawson Street or from the main Hayward's Track. Access from the
Hayward's track is just before you drop down towards Mawson Street.
You will need to follow the McStay track down to the mid-level bush
basin in the Mawson Creek catchment. Coming from Mawson Street,
enter the reserve up the right-of-way at the end of the street.
The entrance to the track is at the top of No 41's red cobbled driveway
(keeping to the south side where there is legal public right-of
-way). From the entrance follow the beginnings of the Hayward Track.
About 3-4 mins after the entrance the track branches. The clearly
marked Hayward's Track runs off to the left, while the less well
marked Mawson Catchment Track turns off to the right. The latter
track is marked in places with plastic bag ties or ribbon and is
reasonably easy to follow up to the mid-level bush basin. From there
it zig zags uphill past a large karaka tree in a constant climb.
Take your time and look around for direction changes, as it is very
easy to stray off track and get lost. From a narrow stormwater gully,
the track veers southwards towards Griffins Ridge and the going
gets easier. The track then keeps to the crest of Griffins Ridge,
exiting about two thirds of the way up the steep fire break that
leads to the telecommunications masts at the top of the Konini Pylon
Rd.
|
|
Te Whiti Fire Break Track
|
30 mins to the fire pond
|
TThis track runs from the north east side of Te
Whiti park up the fire break. Walkers who do not wish to go all
the way up to the Konini fire break on the skyline ridge need only
go as far as either the Rewarewa Track or the fire pond and Ngapunga
Track. From the Whites Line East (playground) entrance to the park,
follow the sealed road to the right. Go past the various sport club
buildings to the gate at the base of the fire break. Follow the
clay road up the fire break. The track is wide and easy to follow.
Some of the steepest parts have easier alternatives which bypass
the steeper bits.
|
|
Griffins Ridge Track
|
1 hour
|
Follow the same route as the Mawson Catchment Track.
About 30 mins from Mawson Street the track forks up left to the
east and down right to the west. The former is relatively easy to
follow, emerging on to the upper part of the Mawson firebreak. The
downwards route to the west is currently impassable due to a combination
of heavy snakefeather infestation, other vegetation encroachment
and storm generated windfalls. It is hoped that volunteers will
gradually recut this section of the track, allowing the route to
be completely reopened in due course.
|
|
Leightons Gully Track
|
1.5 hours from either Mawson Street or Wainiomata
Hill Road
|
As before, from Mawson St, follow the Mawson Catchment
Track. On reaching Griffins Ridge, veer south downwards off the
ridge crest towards Leightons Gully. This should lead down on to
a well formed bench track at a point where an old galvanised iron
pipeline is partly exposed on the surface. This is part way up Leightons
Gully Track. Alternatively, from Wainuiomata Hill Road, look for
a track opening in the bush above a grassed area just past the underpass
for traffic coming up from Gracefield. This entry to the track was
cut by possum pest control professionals. Leightons Track itself
was originally a wide benched track believed to have been used by
horse traffic. Fallen heavy fern fronds, other windfalls, vegetation
encroachment, and several slips which require care to negotiate,
make this track hard to follow in many places. It climbs steadily,
initially well away from or above the stream in the gully. Eventually
it enters and follows the upper reaches of this watercourse. It
finally emerges from the bush near the bottom of the branch roadway
used for servicing the Towai Telecommunication towers. This track
is difficult and should only be attempted by fit people.
|